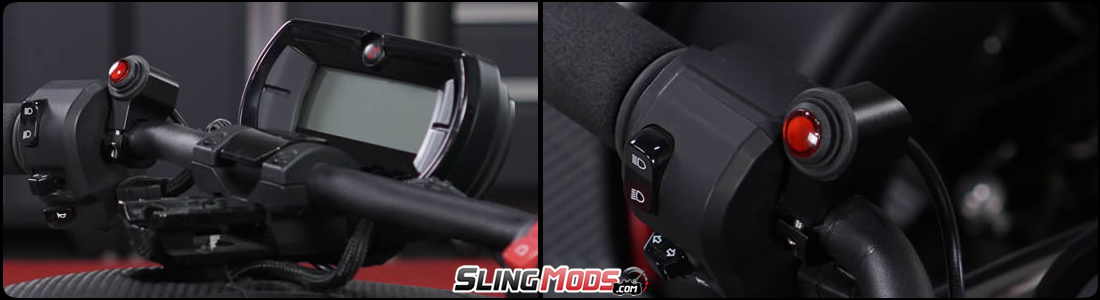
Plug N' Play Push Button Hazard Light Switch for the Can-Am Ryker (Gen 2)

(26 reviews) In Stock
  • $129.95
    $109.95 YOU SAVE $20.00
  •   Login & Earn 550 Points when purchasing this item
  • Part Name: canam-ryker-hazard-light-switch
  • Part Number: SM-7416
Manufacturer:

Hardware Included:
Yes, Handlebar Bracket

Made In:
U.S.A.

Plug 'n' Play:
Yes


Can-Am Ryker Fitment Guide:
2019 Can-Am Ryker / Rally Edition
2020 Can-Am Ryker / Rally Edition
2021 Can-Am Ryker / Rally Edition
2022 Can-Am Ryker / Rally Edition / Sport
2023 Can-Am Ryker / Rally Edition / Sport
2024 Can-Am Ryker / Rally Edition / Sport
2025 Can-Am Ryker / Rally Edition / Sport

Can-Am Ryker Hazard Light Switch
We found it a bit odd that the Can-Am Ryker didn't have any way to initiate the Hazard Lights while rolling in a forward motion. In fact, the only way to initiate them was to put the transmission in the reverse gear with the engine off. Hazard lights are often used while moving forward to notify surrounding motorists of an upcoming traffic hazard requiring unusual care in approaching, overtaking or passing. Since a hazard switch did not exist on the Ryker, we partnered up with the guys over at Hypnotic Concepts to create one. This kit is 100% Plug N' Play and includes an aluminum handlebar mount to house the on/off switch.


Product Details
Hardware Included Yes, Handlebar Bracket
Made In U.S.A.
Plug 'n' Play Yes

No questions have been asked about this product.

Ask a question

Note: HTML is not translated!
Total Reviews: 26
Average Rating: 4.88

02/24/2025 4:15 am


Pretty easy install , only major problem was unplugging the cluster , they plug was on there pretty good , other than that well worth


01/06/2025 6:20 am


Excellent customer service and communication. Products are always as advertised


10/14/2024 5:41 pm

This is my second harness
This is my second harness for my Ryker. The first one failed due to an issue with the mounting screws for my Madstad windshield. Apparently, the mounting bolts for the windshield were too long (by about 3/8") and after some time riding, the harness made intermittent contact with the bolts and eventually it caused a short which blew the F7 fuse and killed the bike. I had it in the shop twice before they figured it out. I replaced the bolts with M6-1.0 X 35 bolts, and now no more contact.
I just ordered a new harness as the original was great until the short happened. The flashers work great! Note: they are always hot (bike doesn't need to be running), so be sure not to unintentionally bump the hazard switch to the on position, or it could run down your battery.


10/06/2024 4:48 am

Hazard Switch Install
Installation was pretty straight forward. With the installation done and all the new leads zip-tied up out of harm’s way, everything worked as advertised. One thing that bothered me was that very obvious, big red button for the flashers sticking out there in front of God and country; it was just too inviting for prying fingers. Since that system was “hot” all the time, I didn’t want to return to a machine with dead battery because someone just had to depress it and leave the flashers on. My solution was to just turn it 90 degrees so the red button was facing forward making it a lot less conspicuous by getting lost in the “clutter” of other wiring and the dash. Still very easy for me to get to when needed.


09/27/2024 3:26 pm

Videos could speak more.
Works great. I do love how your install videos gloss over the hard stuff, never explain how, like reinstalling the middle panel. That was fun with all the extra wiring.

SlingMods Response:
Thanks for the feedback!

Write a review

Please login or register to review
Please login or register to upload photos!

Prop 65 Notice


Prop65 WARNING: Cancer and Reproductive Harm - www.p65warnings.ca.gov
Install Instructions